
PfSense is an open-source firewall software distribution based on FreeBSD. It can be installed in a virtual environment like VirtualBox, providing a powerful networking solution without the need for dedicated hardware. This lab will walk you through the process of installing pfSense on Windows 11 using VirtualBox, allowing you to become familiar with firewalls. It is a practical environment that allows any user to become familiar with all the features and playing around with configurations without the worries of errors or misconfigurations. The lab objective is to simulate the end users machine using a Linux Mint virtual machine connected to the pfSense LAN interface using VirtualBox’s internal network. This will ensure isolation from the main host machine and internet connection from the Linux Mint virtual machine can only pass through the pfSense WAN interface.
Prerequisites
Before starting the installation, ensure you have the following:
- Windows 11 PC: Ensure your system meets the minimum hardware requirements for running VirtualBox and pfSense.
- VirtualBox: Download and install VirtualBox on your Windows 11 machine.
- pfSense ISO File: Download the latest pfSense ISO image from the pfSense download page. Choose the appropriate architecture (usually AMD64) and the installer type (usually “Live CD” or “ISO”).
- Linux Distro ISO: Download any linux distro ISO of your choosing. I will be using Linux Mint for this lab.
Step 1: Create a New Virtual Machine
- Open VirtualBox: Launch VirtualBox on your Windows 11 system.
Create VM:
- Click on “New”.
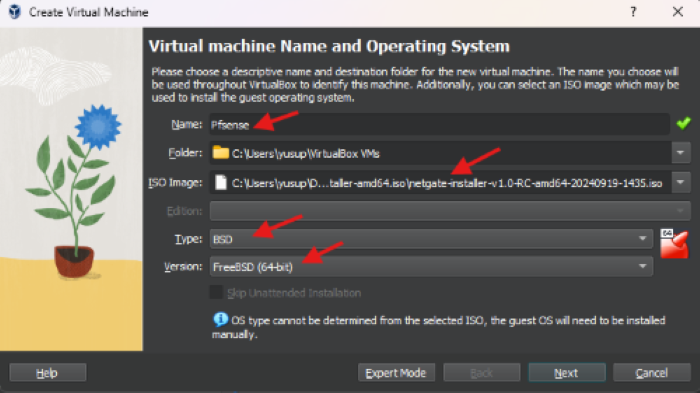
- Enter the following details:
- Name: pfSense
- Type: BSD
- Version: FreeBSD (64-bit)
- ISO Image: Attach pfsense iso image downloaded earlier
- Click “Next.”
Step 2: Allocate Memory & CPU
- Select the amount of RAM. A minimum of 1 GB (1024 MB) is recommended, but 2 GB (2048 MB) or more is better for performance.
- Select the amount of processors. I will be allocating 3 CPU’s , but a minimum of 2 will work.
Click “Next.”

Step 3: Create a Virtual Hard Disk
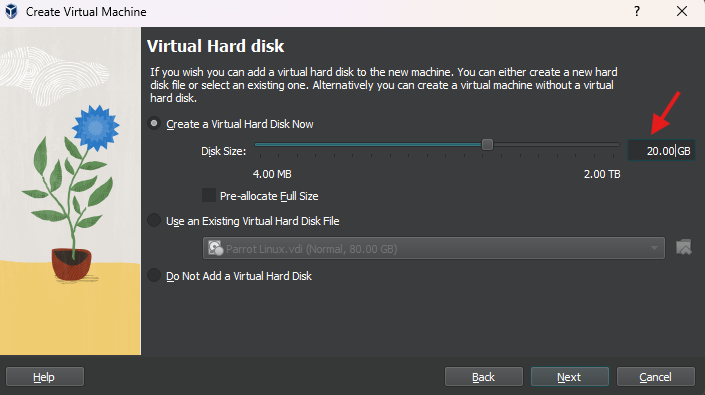
- Choose “Create a virtual hard disk now”
- Set the size of the virtual hard disk (minimum of 10 GB recommended).
- I will be setting mine to 20GB.
Click “Next“
You will get a summary of the pfSense virtual machine installation, if you are satisfied with your configuration , click “Finish”.

Step 4: Configure Network Settings
- Select the pfSense virtual machine and click on “Settings”.
- Go to the “Network” tab:
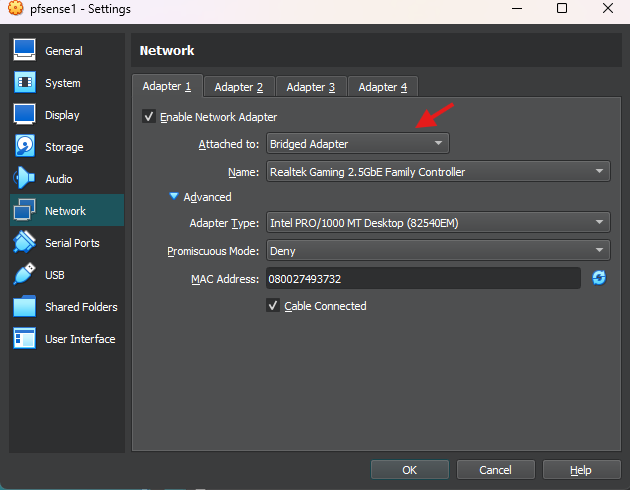
- Adapter 1: Enable it and set it to “Bridged Adapter”. Choose your active network interface (Wi-Fi or Ethernet). This will be your “WAN” interface.
- Adapter 2: Enable it and set it to “Internal Network” and change the name, I will be naming it “pfSenseLAN” . This will be for your “LAN” interface.
- PfSense needs 2 NICS (Network Interface Cards) to function properly.
- Click “OK” to save changes.

Step 5: Start pfSense Virtual Machine
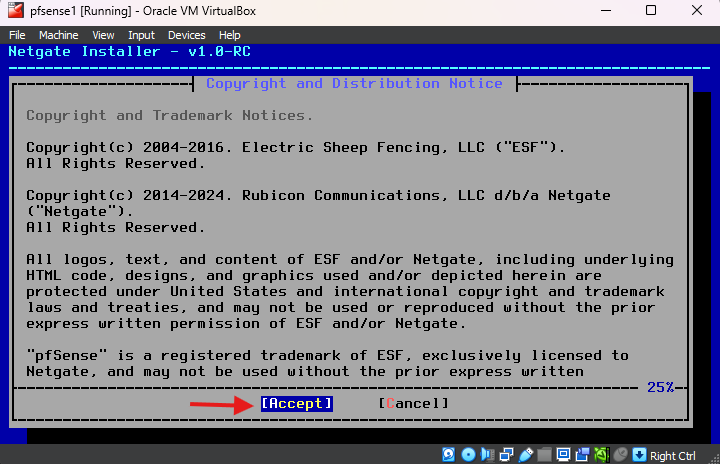
- Start the VM: Click on the “Start” button to boot the pfSense VM.
- Boot Menu: When prompted, click “Accept”, and select “Install” to begin the installation process.


Step 6: Install pfSense
- Interfaces WAN: Select the WAN interface which is the “em0”, hit enter. Next hit “continue”.


- Interfaces LAN: Select the LAN interface which is the “em1”, hit enter. Next hit “continue”.


- Interface Assignment: Confirm the interface assignment and “continue”.

- Subscription Validation: Next screen will tell you you don’t have an active subscription for pfSense Plus, click on “Install CE” , which is the community addition.

- Partitioning: Choose the default file system (ZFS) and default partitioning scheme (GPT) and press “OK”

- Virtual Device: Leave the default no redundancy for ZFS virtual device Config and click “OK”

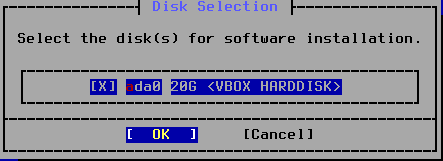
- Select Disk: Leave the default disk “ada0 VBOX HARDDISK” and click “OK”
- pfSense Version: Select the version of the pfSense CE to install which is 2.7.2 current stable release and click “OK”

- Installation Complete: The installation is complete and you will be prompted to reboot to complete installation. Before rebooting, on the top of your pfSense virtual machine , click on “Devices”, then “Optical Drives, and on the bottom “Remove disk from virtual drive” . Otherwise you will reboot right back to the beginning of the installation.

- Reboot the VM: Restart the pfSense VM.
Step 7: Initial Configuration
- After reboot, you will see the pfSense console:
- The default WAN interface is typically assigned automatically.
- You’ll have to configure the LAN interface. Press 2 “Set interface IP address”
- Follow the prompts to finish initial configuration.
- Available Interfaces: Press 2 for LAN
- Configure IPv4 address LAN interface via DHCP, enter “n” no
- Enter new LAN IPv4 address( Use any IP address you want), I will be using “10.0.0.1”
- Enter new LAN IPv4 subnet bit count, enter “24”
- For a LAN IPv4 upstream gateway address, press “enter”
- Configure IPv6 address LAN interface via DHCP6, I will be entering “no”
- Enter new LAN IPv6 Address, Press ” Enter” for none
- Enable DHCP serve on LAN, hit “yes”
- Enter Start address of IPv4 client address range(Use any IP address you want), I will be using “10.0.0.10”
- Enter the end address of the IPv4 client address range, i will be using “10.0.0.255”
- Do you want to revert HTTP as the web Configurator protocol , enter “no”
- Your all done, hit enter to continue after it configures your settings. After you hit enter it will go back to the main screen and you should see your new LAN address, 10.0.0.1/24.


Step 8: Access the pfSense Web Interface
- In order to access the pfSense Web interface we must first configure the network settings for our linux mint virtual machine. We will be using virtualbox for this as well.
- Click on settings , then go to network and under adapter 1 change to internal network and the name we created (pfsenseLAN). Press “OK”
- Now start up your virtual machine instance (Linux Mint) for me. It can be a linux distro of your choosing.
- Next open up a terminal and type the command
ifconfig- You will see the IP address given by the pfSense DHCP server.
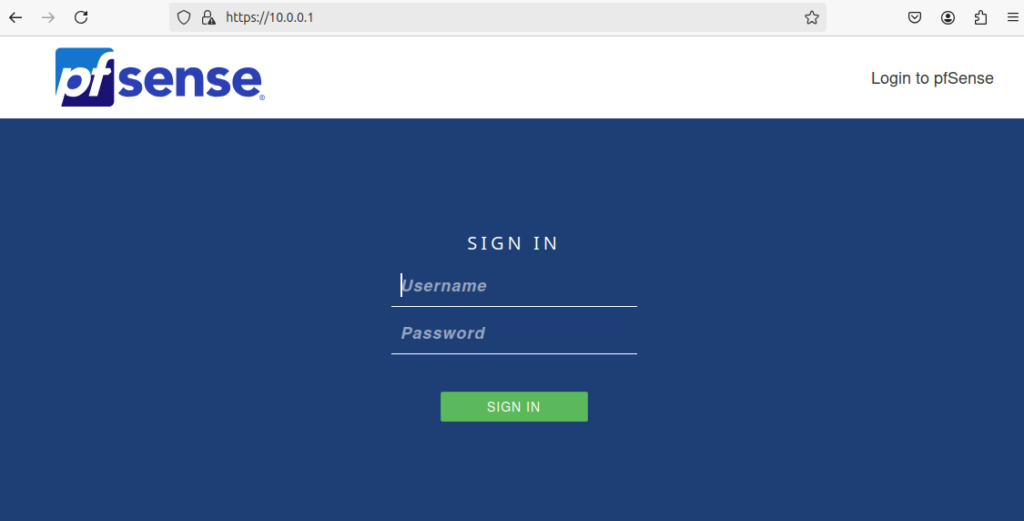
- Now open up the browser and type the IP address you gave for your LAN interface, mine being 10.0.0.1.
- You will see the pfsense login page
- The user name is “admin” and the password is “pfsense”
- After you log in pfsense will prompt you a wizard to complete.
- Finally lets be certain our linux mint machine received its IP address from pfSense DHCP server.
- At the top , click on “status” and then “DHCP leases”
- You will see your linux VM and the IP address.
- The lab is now complete, feel free to add more virtual machines and explore pfSense.


Conclusion
You have successfully installed pfSense on VirtualBox on Windows 11! With its extensive features and customization options, pfSense is a fantastic choice for anyone needing a reliable firewall solution. Don’t hesitate to explore its settings and features to get the most out of your new setup. Feel free to add multiple virtual machines to your pfSense LAN interface. It is not recommended to use pfSense in a virtual machine to replace your home router. If you decide that pfSense is user friendly and the features are what your looking for, then a dedicated hardware is the route to go. If you have any questions or need further assistance, feel free to leave a comment below.


Leave a Reply